SOP - Whole Body Plethysmography - Buxco --PUBLIC
Jump to navigation
Jump to search
Whole Body Plethysmography
Purpose
To study breathing parameters (rate, tidal volume, irregularity)
Experimental Design
Minimum number of animals: Recommend at least 5 animals per group being compared
Age at test: recommended at least 6 wks of age – younger may be possible if they are mobile
Sex: either
Time of Day: typically during the light phase, but may vary depending on study requirements
Equipment
Buxco Plethysmogrpahy System with pull-flow bias flow and unrestrained plethysmography chambers FinePointe Software
Procedure
Turn on the Equipment
- Turn on the Computer
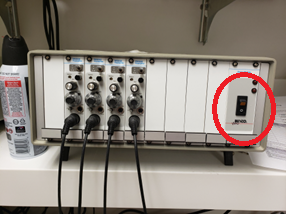
- Turn on the Amplifiers
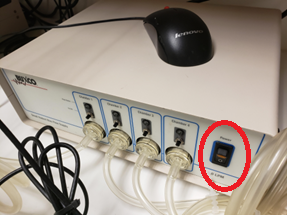
- Turn on the Bias Flow (noe status lights for all bias flow sites should turn green – if not then the flow will not be at the correct setting)
- L ogin to computer (user: Buxco, pass: Buxco)
- Start FinePointe Software (user: Buxco, pass: [leave blank])
- Select or create the study folder
- Launch the chambers (select “Vol” AHR vs Vol)
Calibration (Typically performed by core personnel)
- Obtain small screw driver, and 1mL syringe with connector tube
- Make sure plethysmography chambers are closed and connected to the bias flow pump
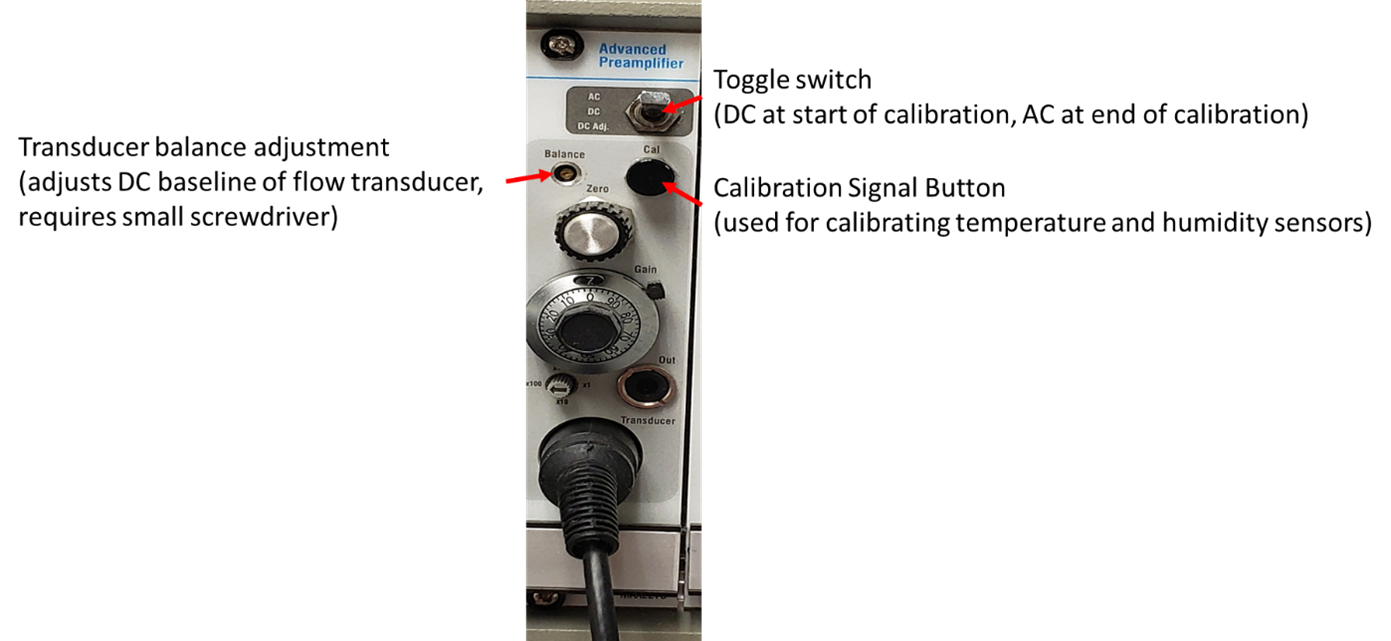
- For all chambers that need calibration, set the amplifier toggle to the ‘DC’ setting
- In the calibration menu – click on calibrate flow
- Load syringe with 1mL of air and connect to the 1st chamber for calibration (this will be repeated for each chamber)
- Follow the onscreen instructions
- Balance the transducer so that baseline reads 0
- Inject 1mL of air into the chamber, confirm that the portion of the signal with the injection is correctly highlighted (note- a smooth injection over 3 seconds works well for this, not too fast, not too slow)
- Switch the toggle to the AC setting and allow the signal to settle
- Review the calibration notes (if error is >30% - redo calibration)
- Repeat 4-6 for all remaining chambers
- For Temperature Calibration – select the calibrate temperature command and follow the onscreen instructions
- Press the ‘Cal’ button on the amplifier and advance the calibration step in the software
- Confirm that the high and low signals are marked correctly
- Expose probe to room temperature (reopen chamber or remove probe from chamber)
- Enter the current ambient temperature value
- (error is typically ___%)
- Repeat 8 for all remaining chambers
- For Humidity Calibration – select the calibrate humidity command and follow the onscreen instructions
- Press the ‘Cal’ button on the amplifier and advance the calibration step in the software
- Confirm that the high and low signals are marked correctly
- Expose probe to room humidity (reopen chamber or remove probe from chamber)
- Enter the current ambient humidity value
- (error is typically ___%)
- Repeat 10 for all remaining chambers
Protocol
(General Plethysmography)
(The suggested protocol is based on the BaSH Study – Volume protocol. This protocol has 30 minutes of acclimation which is discarded followed by 1 hour of recording that is included in the analysis. Modifications can be made if needed)
- Locate the BaSH Study – folder, right click and ‘create new study based on selected study’___________
- Rename study and place in appropriate folder (suggested naming format: YYYY-MM-DD-PI-user-brief_description)
- Update Animals information and assign them to chambers _____________
- Confirm/Finish updating study information to start the recording session
- Session should start and status will reflect whether the mice are in the acclimation or recording phase
- At the end of the recording the session will display “Task Sequence. Not Running”
- Run another session with the next batch of animals – we suggest cleaning the chambers between groups of animals – (clean bases with running water and dry, wipe tops using damp paper towel)
- End the Session
- File->End Session
- In the FinePointe Software – select your study and export/confirm data – copy to usb drive
- Exit software and turn off computer
- Put away mice
- Turn off bias flow
- Turn off amplifier
- Clean chambers (clean bottoms using detergent and water, rinse well and dry, wipe tops using damp paper towel)
(Video Recorded Plethysmography)
- ...
(Gas Challenge Plethysmography)
- ...
Data Outcome Measures Produced
Common parameters of interest
- Outcome Measure 1 : description of what the outcome measure is (how it is calculated, what common interpretations may be, etc.)
- Outcome Measure 2 : description of what the outcome measure is (how it is calculated, what common interpretations may be, etc.)
Troubleshooting
- unable to detect hardware
- check USB hub, it may have become dislodged/disconnected


