SOP - Hypoxic Housing Chamber --PUBLIC
Jump to navigation
Jump to search
Hypoxic (or Hyperoxic) Housing Chamber
Purpose
House animals in a modified atmosphere (i.e. 10% O2 in Nitrogen)
Experimental Design
The chamber is activated, calibrated, and set at specified Oxygen and Carbon Dioxide levels. Animals are housed in the chamber.
Equipment
Coylab
- Acrylic housing cabinet
- Dehumidification system
- Oxygen sensor and controller
- Carbon Dioxide sensor and controller
- Animal filtration system
Consummables
- (weekly) Activated Charcoal
- (weekly) Carbolime
- (1-2 years) O2 sensor, HEPA filter
- O2 cylinder
- N2 cylinder
Procedure
Turn on the equipment
- Turn on the power strip
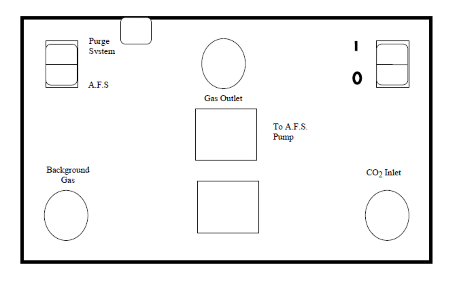
- Turn on the Carbon Dioxide Sensor and Animal Filtration System
- Power should be “on” and system should be in “A.F.S.” mode
- Allow the system to warm up
- Turn on the Oxygen Sensor and Controller
Calibrate the equipment
It is recommended that the Coy O2 Controller and Sensor be calibrated every 1 to 3 months or as need by user. It is recommended to do a 2 point calibration process (zero and span).
After allowing the Oxygen system to warm up (at least 60 minutes), perform a calibration.
- Place the sensor in a 100% nitrogen atmosphere (use the zero calibrator chamber).
- Allow it to equilibrate for 30 minutes.
- The Controller display should read 0%. If it does not, adjust the zero potentiometer (labeled Zero) on the front panel to 0%.
- Allow the sensor to equilibrate to ambient conditions for at least 30 minutes.
- The ambient oxygen concentration should read 20.9% +/- 0.1%.
- If it does not, adjust the percent potentiometer (labeled "%") on the front of the O2 Controller until 20.9% +/-0.1% is read.
Set the Atmosphere conditions
Carbon Dioxide
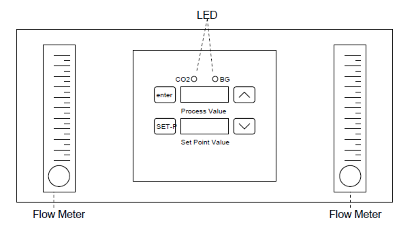
- After going through a warm up period, the display will show two numbers. The top number (Process Value) is the measured CO2 concentration and the bottom number (set point value) is the present CO2 set point.
- Press the lower left key (SET-P). This enables the set point to be adjusted. If the SET-P button is not pushed the user could push the up and down buttons and nothing would change.
- Press the arrow key (up or down) until the desired set point for the CO2 level is displayed in red on the bottom numeric display.
- Press the upper right key (Enter) to set the value in memory. If you do not do this, the new value will NOT be set, and the previous value will be restored. Notice that if the set point is outside the control tolerance (0.1%) the Red LED will turn on indicating that the pump needs to turn ON to remove excess CO2
Oxygen
- Notes: After calibration is complete disconnect gas from calibrator. When reinstalling sensor in cabinet make sure sensor is at least 3" from any surface.
- Turn on N2 tank knob and valve. You should notice a sharp drop of the level of O2 if the set point is below ambient
- Turn on O2 tank knob and valve.
Making adjustments to the set points for O2
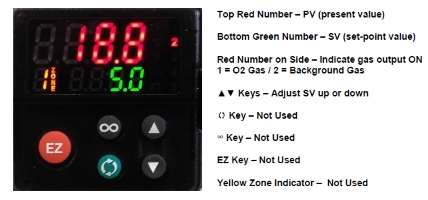
- After warming up and calibrating the system, Press the ▲▼ keys to adjust the SV (set-point value) (green numbers displayed) to desired O2 setting.
- Once SV display is adjusted to desired O2 setting the controller is ready to start controlling O2 in the Chamber/Glove Box/Cabinet.
While system is running wipe down glove box/cabinet, check drainage of dehumidifier tubes, turn on fans, refill canisters.
Monitor the animals
- Daily while housing animals, confirm that O2 and CO2 levels are at the correct set points.
- If tank pressure is below 500 PSI, for O2 or N2 – replace the tanks.
- Check Animal Filtration System if cartridges require replacement (i.e. soda lime will become pink/purple if exhausted – if CO2 levels are accumulating and scrubber system is not reducing CO2 – replace cartridges anyway.
Filtration System Replacement
- Unscrew cartridge container from filtration set up.
- Remove cartridges from container.
- Remove the tape from the end of the cartridge.
- Remove the end cap and filter element.
- Remove filtering material and dispose of it in accordant to Local regulations. (wear PPE and place in designated waste container.)
- Refill cartridge with new filter material (carbolime or activated charcoal depending on canister) about half way. Tap the cartridge gently on table top a couple of times to compress the filter material. Finish filling the cartridge to with in about 1 ¼” to the top. Tap the cartridge again gently on table top a couple of times to compress the filter material. Add more filter material if need to bring material to with in 1 ¼” to the top.
- Place end cap on the cartridge and tape closed. Note: When taping end cap onto the cartridge be careful not to cover the hole on the cap with the tape. Keep the tape on the side of the cartridge and cap.
- Reinstall cartridges


